

How To Make a Pond Out of a Planter
*Affiliate Links
I had always wanted to have a pond in my garden but with it being very small plus with having pets and children I just felt as though it was something I couldn’t ever do whilst we were living in our current home. But then I saw a large planter for sale for just £10 on Facebook Marketplace and some ideas started flying around my head. I immediately bought it and began to research how I could transform this into a pond that would fit in our garden, that would suit the style of our garden, that would attract wildlife but would also be safe for the children. It was a project of love. I enjoyed every moment of planning and putting it all together, and now I just cannot get enough of sitting out in my garden looking at my pretty new pond. So I thought I would jot down how I went about creating a pond out of a planter.
Prepping Your Planter
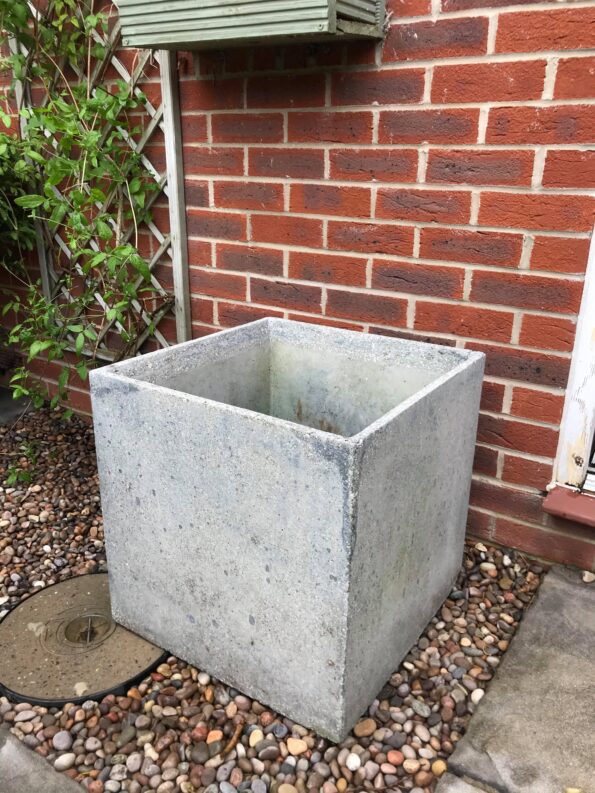
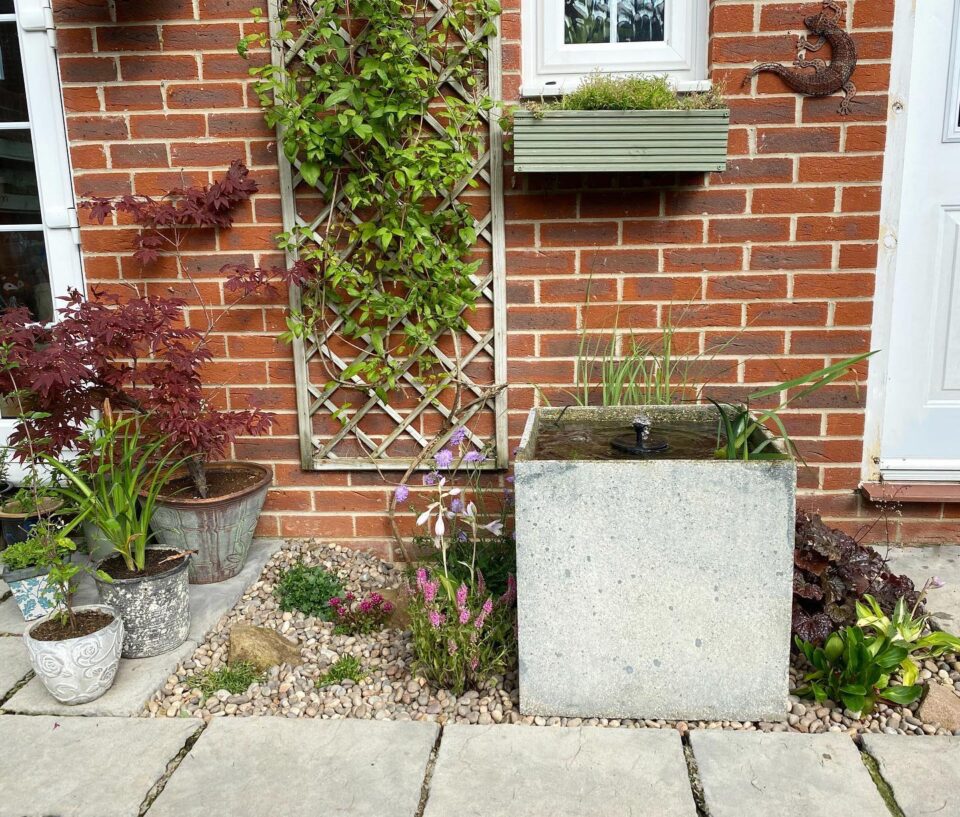
The planter I purchased was a large, grey, concrete one which had been previously used which meant it came with dirt and grime as well as a few cracks. I began by cleaning it all up using just a hose to wash it out. I then added a little bit of castile soap to a bucket of water and took a reusable cloth to clean up the outside of the planter. This process will give you the chance to fully check any damage, to see what may need attention and it will give you a nice clean surface to seal.
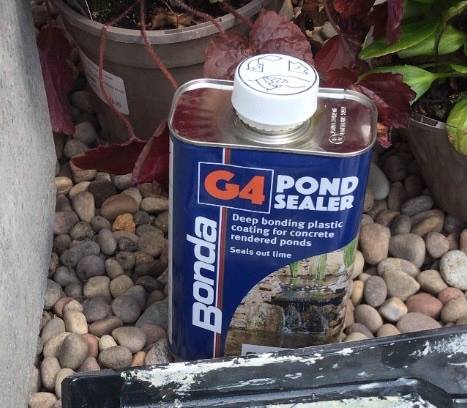
For the cracks, I bought a clear crack sealant from a pond company called All Pond Solutions which you can view here. As it was a planter, the pot did have a drainage hole in the bottom so I just simply filled this with some waterproof filler. Once dried, I could then move onto the bigger stage of sealing the whole of the inside of the planter. For this job (after quite a bit of research) I chose to go for the clear G4 Pond Sealer which is a deep bonding plastic coating for concrete ponds. This requires 3-4 coats and each must dry until slightly tacky before the next coat can be applied so make sure that you clear your diary for half a day or more to ensure that you can check on the progress, you can protect your planter if it rains and to make sure that you don’t leave it too long between each application. Once this has been completed you will need to leave your pond planter for 72 hours before you can move on with your project.
3 Days Later…
When your 72 hours are up and you are happy with your coverage you can wash the inside out with cold water. When you have given it a really good rinse, you can begin to create your pond.
Choosing a Spot
Choosing a spot in your garden is an important step as you want to ensure that your pond will have enough sunlight, you probably want it away from a tree as falling leaves will cause a problem, you will need it away from children playing and you will want to choose a place where you can sit and enjoy it. A planter makes a great pond because you can purchase the size that will work for your garden or even your yard or balcony, it can easily sit on a patio and won’t take up too much room.
We opted to remove our (rusted and pretty unused) BBQ from this stony area as it just really felt drab and I could see it had so much more potential.

The Pond
Obviously, it is completely up to you how you make your pond look but you should be able to get all you need for this from a local garden centre, a local aquatics specialist or DIY store. I opted for large pebbles from a garden centre to sit in the bottom of the pond mostly for the design element but to also provide little hidey holes for any wildlife that may (hopefully) one day arrive.
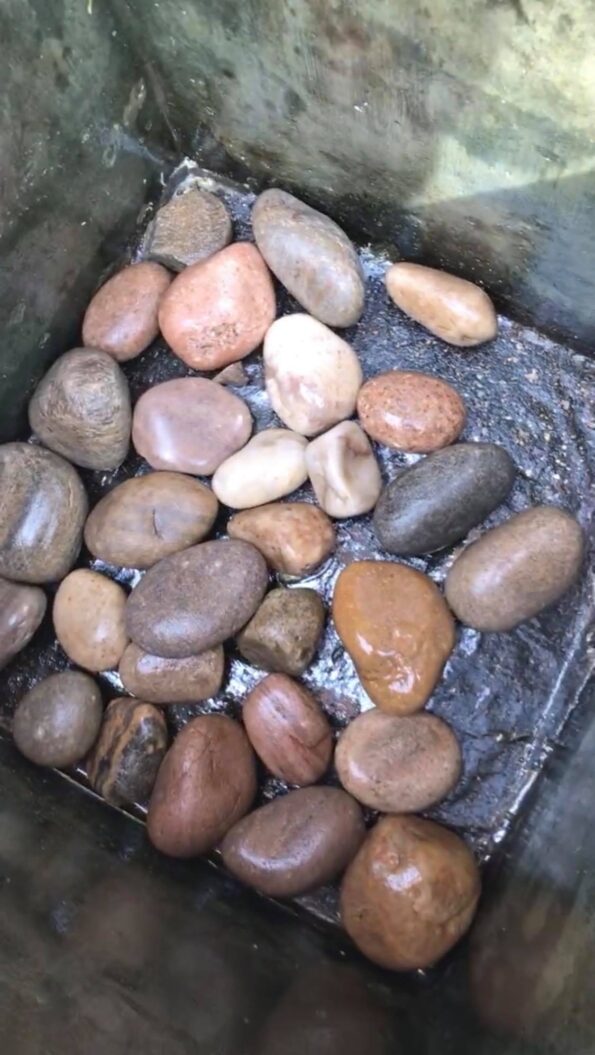
I also chose grey slate stones to pile up on top of one another to create a ledge, again for wildlife to use to gain access to the water.

Your pond will need at least one good oxygenating plant to prevent algae build-up and you may want to add others for attracting insects and also for aesthetic reasons. I purchased all of mine at Maidenhead Aquatics who have quite a lot of branches found within garden centres. The staff can advise what you will need, how much and how to care for them.
Water Feature
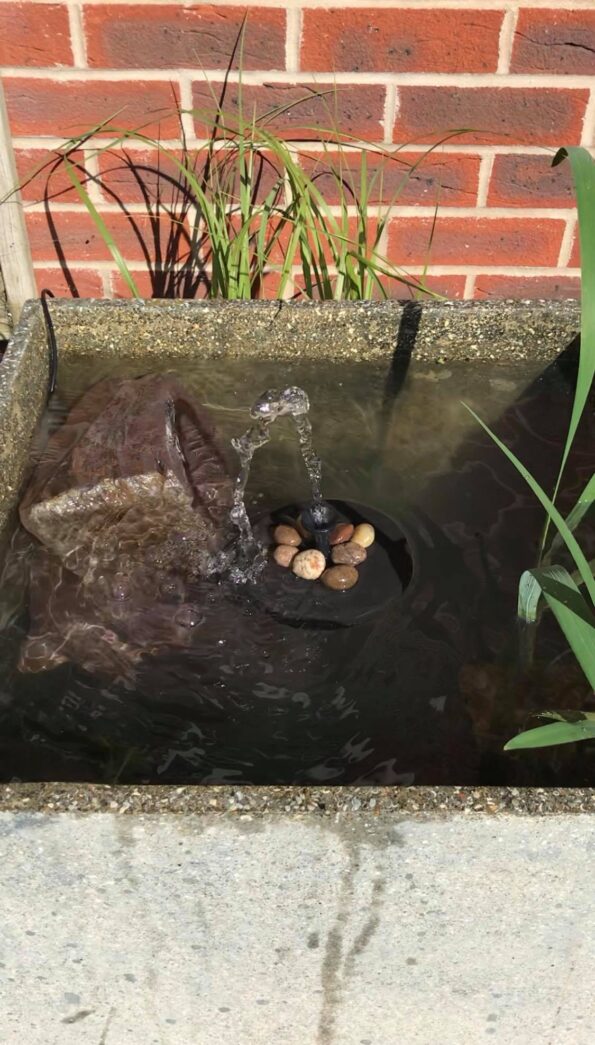
The final touch for your planter pond could be a mini water feature. There are many options on the market but if your planter is quite small, do check the size of the fountain or radius of the spray etc. You will also want to decide between a solar pump and an electric one. A solar pump is far more eco-friendly but your feature will not work at night or when it is cloudy. An electric pump will require access from the planter pond to your mains inside your home and you will need to remember to turn it off as and when required.
It has been long reported that solar power isn’t enough to power a pond pump but the one I chose to use has certainly proven otherwise. The AISITIN Solar Fountain Pump 6.5W comes with 6 nozzles for you to adapt your fountain and it is more than powerful enough for what we need.
The Surrounding Area
Just as above, what you create around your planter pond is a personal choice. We opted for a rockery using pebbles which we already had but you can purchase similar from Homebase here, larger stones from a garden centre and perennial plants that will stand the test of time, will grow to surround the pond and cover the ground. By adding plants, flowers, rocks, shrubbery, grasses and so on, you will be tying the whole area together and creating a beautiful feature that you will love looking at in your garden.
And there we have it, the finished project. Other than the sealant taking a few days to fully bond, the rest of the job took me one day so it really doesn’t have to be time-consuming at all. It just goes to show that with a little careful planning, you can transform any tiny space into something completely different and stunning.
*We also made this small wildlife pond in a plant bed further down the garden which may be of interest too.

Pin for later:
Related Posts:
How To Build A Pallet Planter
*Affiliate Links Pallets are just so versatile and can be turned into almost anything but they can also be often Read more
Where To Begin With Growing Your Own

Growing your own fruit and vegetables may seem a little daunting at first but with a little bit of research, Read more
How To Make A Boot Brush

*Contains Affiliate Links With the many muddy walks we've been on recently, my hallway was starting to look worse for Read more
DIY: Building a Bughouse
It may seem like we are always trying to get rid of unwanted pests and bugs in our garden but Read more